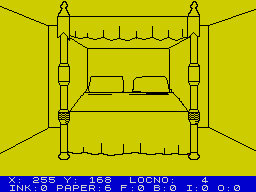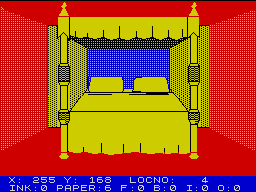
On its way to become...

...this
Franco Frey exchanges The Quill for a brush...
| It is seldom that a utility program which is readily available to the end-user is taken seriously and put to earnest use for creating marketable software, but Gilsoft’s The Quill is a remarkable exception and has proven to be a very popular professional tool for creating exciting text adventures. To the dislike of many traditional adventure players the market is swinging towards the more popular graphical adventures, not to speak of the rogue arcade adventures, and this has caused some concern to the bequilled software writers. Many of these have already extended the Quill’s facilities with their very own in-house graphics utilities, but now Howard Gilberts has released the official Quill graphics creator, The Illustrator. This program links up to the Quill database and provides full picture editing facilities. The Illustrator combines the graphics with the database of The Quill and saves these in such a way that using LOAD "" from Basic will cause an autorunning graphic adventure to load into the Spectrum. |
The Quill/Illustrator combination enables the creation of a graphical adventure with full-screen (255 x 175 pixels) pictures. Up to 254 pictures may be created. The program can be set to normally draw the picture only on the first visit of a location (Flag 29 is scanned by The Illustrator interpreter and if SET the picture is drawn and the flag cleared). The picture may be recalled whenever REDESCRIBE is used by the player (The REDESCRIBE entry in the Event table has to be altered for this). Split screens, i.e. combining picture and text, is not possible. The amount of pictures in the adventure is only limited by the free memory space, in theory every single location may have a picture, but under normal circumstances graphics will have to be limited and the interesting locations chosen, which are to contain graphics. The Illustrator is designed to add graphics to a C-series database, i.e. a database saved from a C-series Quill. The serial type of the Quill can be gleaned from the opening screen (A03,C02). A-series databases may be however converted to C-series with a special conversion routine "A-CCONVERT" provided on the cassette provided there is at least 990 bytes of free memory.
Starting point is the Quill. The adventure is designed in the normal way and suitable graphical locations pinpointed for later creation. The REDESCRIBE entry in the Event table may be modified to enable the redrawing of a picture on call-up when re-entering a previously visited location. The created database is then saved from The Quill with the name of the final adventure. Using The Illustrator, a suitable blank graphic database is created with the LOAD database facility. The pictures are created using the Graphics Editor of The Illustrator. Any locations which do not have graphics are defined as subroutines and the graphics database saved to tape. The Quill database and the graphics database are combined with the SAVE Adventure routine of The Illustrator, which also finally saves the adventure as an independent game to tape. All that is left to do is the final testing of the game to make sure it is absolutely bug-free.
As memory space is restricted, the graphics are not stored as voluminous screens in memory. The technique used in The Illustrator is that of storing a string of drawing commands, which the Graphics interpreter lodged within the final game will recognise and execute. The picture will therefore be drawn by invisible hand the same way it was programmed within the editor, but at a much faster speed. The graphics editor provides all the necessary operations such as setting paper and ink colour, moving and positioning the drawing cursor, plotting individual points, drawing lines and filling areas or spaces with solid colour or texture. Once the basic picture is programmed, corrections and additions may be made with an ingenious editor facility. The editor single steps through the existing drawstring and executes each command step by step. At any given point new commands may be inserted with the remainder of the picture to follow. A special subroutine is provided for drawing repetitive objects such as doors, windows etc. and these may be called up within the drawstring with a simple command. To make this facility more useful, the object may be drawn at up to 8 different scales to accommodate the specific circumstances.
The Illustrator has to perform several tasks and the function blocks may be accessed via the Main Menu. Following the required sequence LOAD database (option G) loads the first few bytes of the Quill database in order to know how many locations are contained in the adventure and to establish the whereabouts of the first free memory locations. The required number of graphic locations will be initialised. This is either required for setting up a new adventure or to amend the graphic database if changes have been made to the original Quill database.
Graphics Start Table (option B) is used to set the status of a picture. The initial Global background colours have to be set up. All locations in the adventure which do not require a picture should be Amended as a subroutine. The status of the pictures can be printed to the screen or to the printer.
Bytes Spare (option C) displays the number of bytes between the end of The Illustrator or the end of The Quill database and the bottom of the graphic database.
Graphics (option A) leads to the major work area, where the picture is created using the Graphics Editor. Pictures may be inserted, amended, printed or have their length calculated.
SAVE Graphics (option D), VERIFY Graphics (option E) and LOAD Graphics (option F) provide the facility of storing the partly or fully completed Graphics database to tape and to reload for a further work session.

On its way to become...

...this
The Editor provides four groups of commands; Editing, Drawing, Colour and Subroutine commands.
The Editing commands position of the drawstring pointer within the drawstring. S (START) puts the drawstring pointer at the start of the drawstring. N (NEXT) executes the next available drawstring command; if there isn’t one the command is ignored. 9 (PREVIOUS) moves the drawstring pointer back one command and updates the screen. Shift & 0 deletes the previous command in the drawstring and re-establishes the picture to the condition prior to the deleted command. This ‘rubber’ feature enables comfortable experimenting of draw commands. Shift & N deletes the next command if there is one. Extra to these editing commands there is the Y (GRID) command which toggles an attribute or character grid on and off. This allows accurate positions of colour boundaries to be taken account of while drawing.
The Drawing commands operate with a two cursor system. The Base Cursor (BC) shows the last point plotted, moved etc., the Rubber Cursor (RC) shows the next position of the Base cursor or the point for a fill. The Rubber cursor is moved around the screen using the keys grouped around S. It moves a pixel at a time and can be speeded up by pressing Shift at the same time as a direction. At the bottom of the screen is the Status Box which contains the current X and Y co-ordinates and the number of the location currently being edited. The bottom row displays the current values of INK, PAPER, FLASH, BRIGHT, INVERSE and OVER. P (PLOT) sets the pixel at the position of the Rubber Cursor according to Inverse and Over. M (MOVE) moves BC to RC without affecting the screen. This is coded as a relative offset from BC and therefore care must be taken not to insert draw commands at a later date as it will affect the outcome of the picture. L (LINE) draws a straight line from BC to RC. F (FILL) causes the area which contains RC to be filled with set pixels. No notice is taken of Inverse or Over. T (SHADE) allows areas to be filled with one of 255 shading patterns. No printout is available in the manual, so some experimentation will be necessary. Shift T will affect also the boundary area (covers the outline). H (BLOCK) causes a block of the currently selected colours to appear between the BC and RC character positions. R (FREEHAND) toggles the freehand facility on and off. The cursor movement is treated as a pencil movement and each pixel plotted according to Inverse and Over. The FREEHAND feature should be used very sparingly as it eats up a lot of memory. The aforementioned draw commands should cover most needs, although what does seem to be missing is a CIRCLE command. This is a shame, as the only way around this shortcoming is to imitate a circle with a polygon or with memory-expensive freehand drawing.
The Colour commands are straightforward. The current INK is set to the value of the key pressed and includes INK 8 which causes all ink to be taken from the existing screen. The current PAPER is set in a similar fashion to INK, but with SYMBOL SHIFT. Paper 8 as in Basic. V sets a new FLASH value, B a new BRIGHT value (0,1 or 8). I and O toggle INVERSE and OVER on and off.
The Subroutine command requires a picture number and a scale value. This can be from 0 (No scale) to 7 where the number indicates the size of the picture in eighths. Scale only affects certain draw commands. These are MOVE, LINE, FILL and SHADE. BLOCK and FREEHAND commands will not be scaled or relocated and should generally not be used in subroutines. Subroutine calls can be nested to a level of ten.
The introduction to the working technique of The Illustrator is very clear and easy. The manual, which consists of a 28 page A5 booklet guides the user through a working session with the aid of the well known DEMO adventure encountered in the Quill. A partly completed Graphics database GRAPHICS is contained on tape and may be loaded, the missing picture of the hall designed following the instructions carefully and the two databases combined and stored to tape via the SAVE Adventure facility. This example should introduce the user to the general procedure. The detailed description of the individual utility blocks such as the Interpreter, the Graphics Database, the Main Editor and the Graphics Editor follow in the next section and should give an answer to any pending question. Listed are also all the Editor error messages which can be encountered. In the Appendix there is an explanation on the required Series conversion and a general approach to the design of a location picture. A summary of the Graphic Editor commands provides a quick reference.
The Illustrator extends the capabilities and applications of The Quill. It provides a very easy means of creating graphics and combined with the excellent Quill enables a lot of people to design outstanding adventures without too much technical knowledge. It is perhaps this feature which has made the Quill such a success in the text adventure market, where writers with a flair for intrigue and mystique have been able to create characterful adventures without the fuss of having to handle machine language. Perhaps the Illustrator’s only disadvantage is that it could lead to a plethora of repetitively styled adventures due to its relatively inflexible display format. It will be up to the adventure writer to avoid this pitfall and to demonstrate the inbuilt versatility of the system.